


User Options - Schedule
Access the Schedule Settings
Select Setup >> User Options >> Schedule.
Configure Schedule Settings
In Schedule Settings set up the following:
Total daily hours available
Enter the available number of work hours for each day.
- Example: The number of technicians multiplied by their available work hours per day.

Color code R/O by
Select to include color coding for schedule entries based on R/O Status or Work Type.
- Note: You must have Status Codes or Work Types Codes set up in order to use color coding. Code Settings - Advanced

Specify workshop bay and duration for Inspection bookings
Enable this option if you are using the Inspection Schedule.![]()
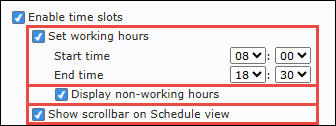
Enable time slots
Create a grid of hours on the schedule, broken into 15 minute increments.
- Customize time slots view with the following options:
- Enable time slots - Enter the Start Time and End Time for the shop's work day.
- Display non-working hours - Show or hide all time slots outside of the specified start and end times.
- Show scrollbar on Schedule view - Allows you to scroll the schedule independent of the page. (Helpful on systems with smaller monitors or low screen resolutions)
Diminish R/Os on the Scheduler Calendar when Complete
Use this option to "grey out" appointments on the schedule that have been completed (Invoiced).![]()
Display Customer Name in Available Documents section
Choose to display customer names on the documents awaiting to be scheduled in the Available Documents section.![]()
Enable Custom Repair Order Information
Choose what items to include on each schedule entry by:
Selecting an item
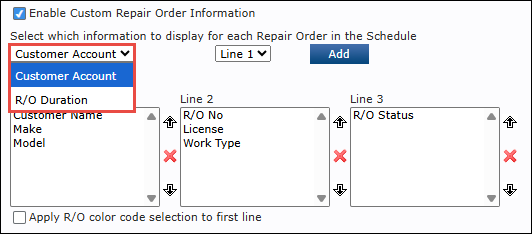
Selecting a line.
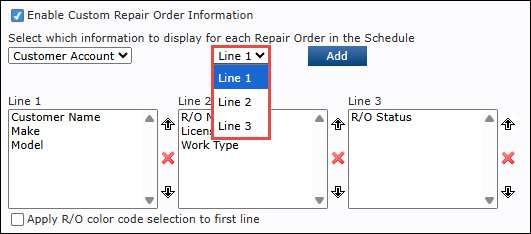
Clicking Add.

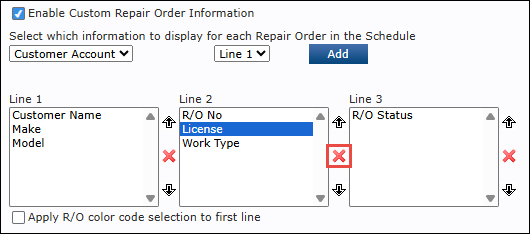
Change how each line displays the included items by:
Selecting an item that has been added to a line.
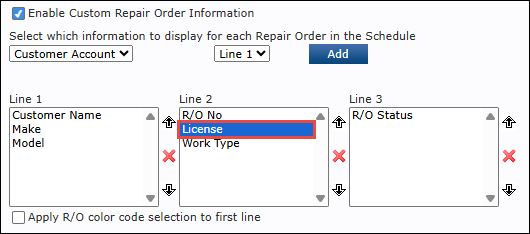
Selecting the Up and Down arrows to change the display order.
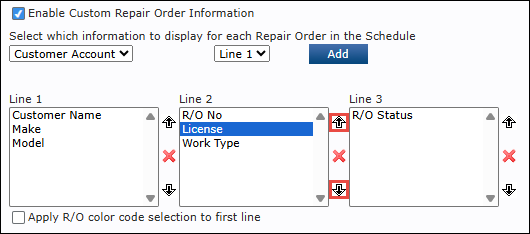
Clicking the X to remove the item from the line.
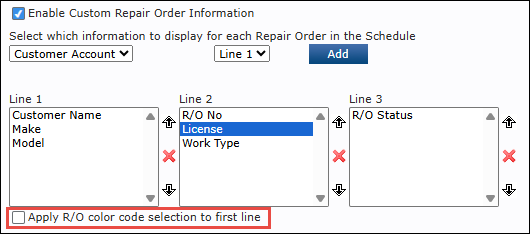
Apply R/O color selection to first line - Applies color based on Repair Order status (Can be changed in Setup >> Codes >> Status)
Schedule Bay Display
Select the amount of bays you want the schedule to display.
- Current bays will display below in Current Bays.

Current Bays
Rename, reorder and delete bays.
- Note: This will only change how the bays appear on the main Schedule. This feature will not apply to the Inspection Schedule.

Due In / Out
Set the Default Due In Time and the Default Due Out Time for all new R/Os.
- Click the calendar icon to select the time.
- Click the Use Schedule Start Time If Available check box to automatically apply the date and time of the R/O on the schedule to the Work document.

Work In Progress Options
Set the amount of minutes to be visually notified that an R/O is due in/out.

- Note: The visual notification is the R/O displaying a yellow color when using the Work In Progress (WIP) screen.

- Note: The visual notification is the R/O displaying a yellow color when using the Work In Progress (WIP) screen.
- Remove completed Repair Orders from the Work In Progress (WIP) screen, after a set amount of days.

- Notes:
- 7 days is automatically set as default.
- You can also remove Repair Orders manually and automatically from the Work In Progress (WIP) screen.
- See Using the Work In Progress Screen >> Removing a Work Document from
- Notes: